From Figma to Power Apps

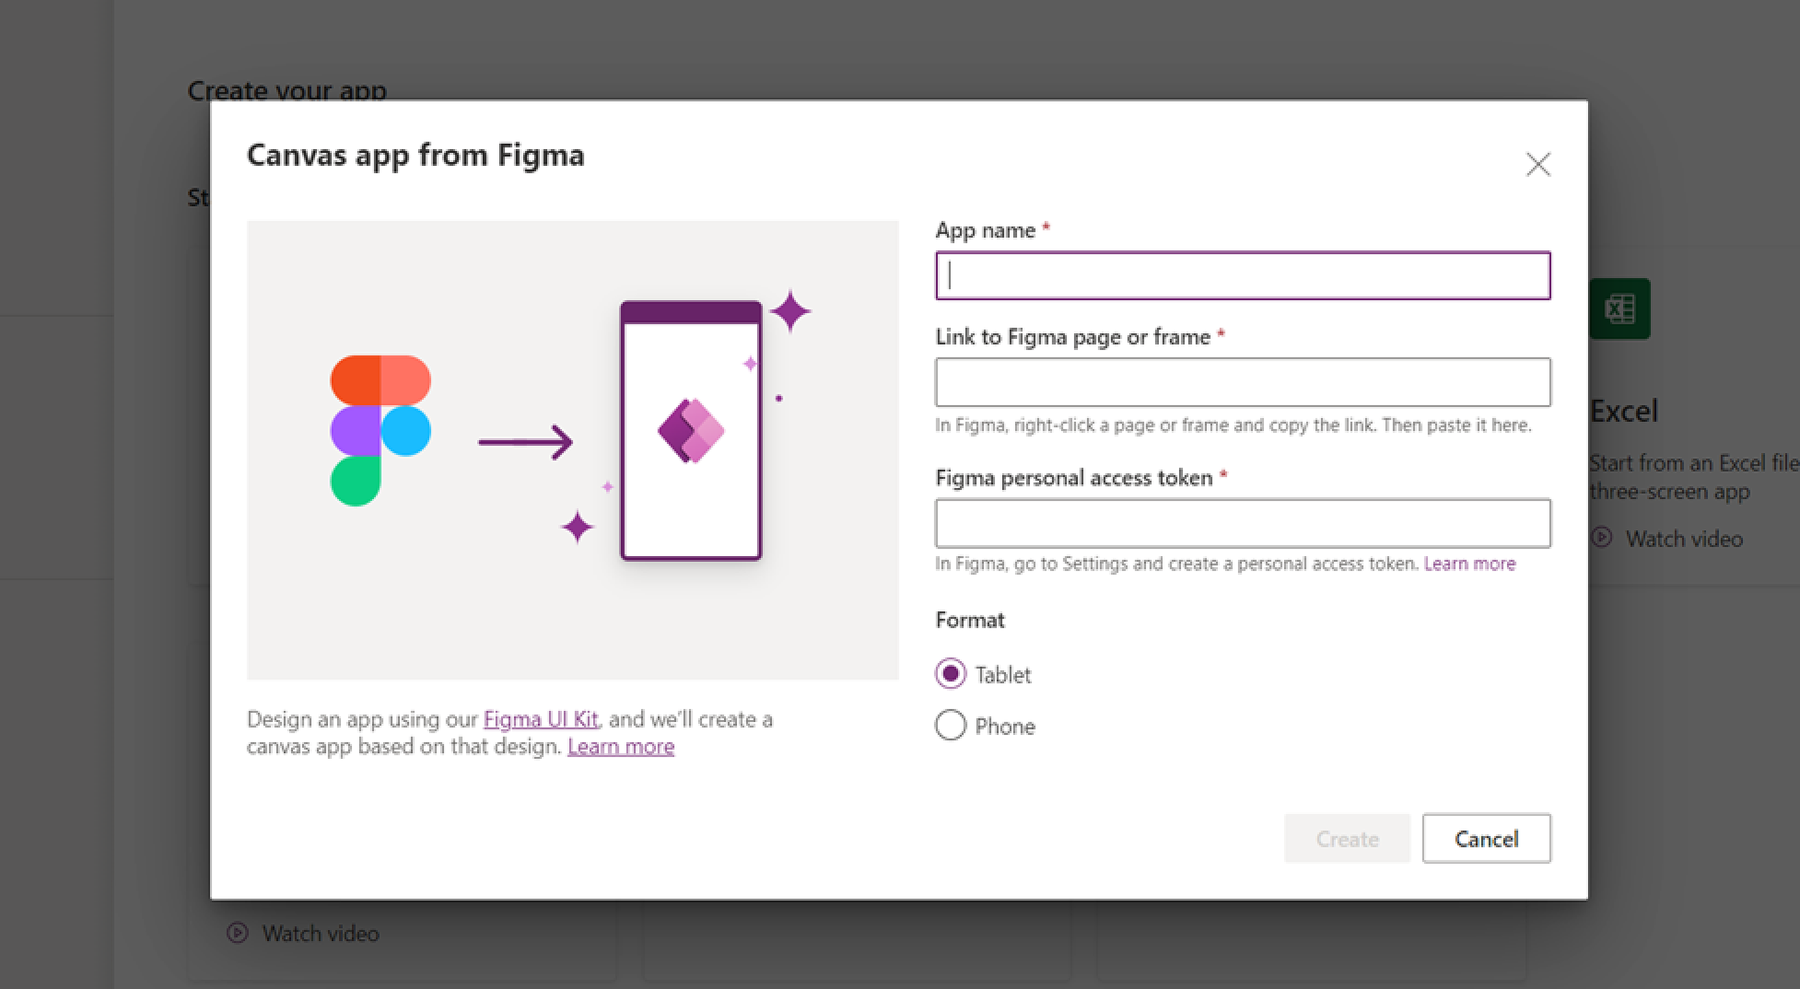
It has never been easier and faster than now to develop an application using low-code platforms to streamline or automate certain processes in a company. Discover in this article the feature proposed by Microsoft to transform a Figma file into a Power App. This functionality aims to reduce the gap between design and development and increase quality.


Author: Georgiana Balan

Recently, more and more low-code platforms have been developed, enabling developers to create applications in an easier, faster, and even cheaper way than before and that can be used by end-users without extensive coding knowledge.

Even in these cases, it has been proven that it is extremely important to involve a UI/UX designer in the development process to ensure that the end-user needs are understood, the user experience is as pleasant as possible and the flows easy to go through and comprehend, without loading the user's cognitive memory. As Jakob Nielson said in one of his videos: "Low-code platforms and other end-user programming or simplified implementation don't remove the need for task analysis and other deeper UX work and thus don't guarantee great usability. But they can free up budget for better UX work".

Georgiana Balan

UI/UX Designer

In this post, we will discover a new functionality that Microsoft has added to Power Apps, namely, to create Power Apps directly from Figma files. For those who do not know what Figma is, this is a tool used to create and share designs for apps, websites, or other digital products, and it is used especially by UI/UX designers but also by product managers, developers, and other users involved in the design process.

Therefore, we will discover the pros and cons of this functionality from the perspective of a UI/UX designer.

What is Power Apps and How to use the Figma feature?

Microsoft Power Apps is a low-code application development platform that allows users to create custom applications without extensive coding knowledge. It provides a user-friendly interface and drag-and-drop functionality to design and build web and mobile applications rapidly. Power Apps leverages the Microsoft Power Platform, which includes other tools such as Power BI for data visualization and Power Automate for workflow automation.

This feature aims to bridge the gap between design and development by accelerating the app UI development process and allowing developers and designers to collaborate effectively and efficiently to deliver great end-user experiences with low cost and effort.

Feature goals:

  • Minimizing the developer effort to build the interface;
  • A better control of the UI for the UI/UX designer;
  • Deliver products faster.

Important to mention here is that although this functionality is no longer in preview and can be used, the last update of the Figma UI Kit was 1 year ago. In the meantime, there have been updates to Power Apps, but they are not done in the UI Kit. So be aware of that before using this feature because it might undergo changes along the way, or bugs and other issues could appear.

To try and test this functionality, I recreated in Power Apps the design of an application already developed and used by Centric Netherlands before this functionality appeared. Thus, I was able to compare the benefits that this feature could bring, but also the things that should be improved and taken into account.

Figure 1. The application taken as a case study

Working process

The process to create a Power App directly from Figma is quite simple and straightforward. The process is divided into four steps, and they are important to follow in order to be sure that the import of the design from Figma is carried out successfully.

Figure 2. The steps of the working process

In the image presented above you can see, in a more schematic way, the four steps:

  • the first step is reading the documentation regarding the functionality;
  • the second step is the actual creation of the design in Figma with the library provided by Microsoft;
  • the third step is the conversion of the design into Power Apps;
  • the last step is the addition of the app logic and making everything interactive and useful.

Step 1: Getting started

As I mentioned before, it’s very important not to skip reading the documentation from the Figma UI Kit. Even if it’s tempting to want to go directly to the more fun and practical part, it’s important to read in detail because there are specified certain limitations and things that didn’t work or that could cause problems during import.

Figure 3. Microsoft UI Kit in Figma

To be considered:

  • Use the set of components that are supported for the moment. Unfortunately, components such as charts, tables, galleries are not yet supported, so this UI Kit can be used for less complex applications;
  • Use the components based on the device you are designing. Either tablet or mobile;
  • Keep the naming conventions used in the UI Kit, otherwise the components may not be imported correctly.
  • Be aware of the difference between the unit used for the font size. Figma uses pixels for font size. However, Power Apps will convert those pixels to points. Specifically, one font pixel in Figma is equal to 0.75 points in Power Apps. (This conversions are used only for typography. Other elements heights, width, margins, paddings etc. remain as they are in the design).
Figure 4. Font size conversion

Step 2: Design your apps

After you have an idea of what is possible and what is not, comes the most interesting and fun part, building the application screens using the components and respecting the guidelines from the documentation.

Before starting the design of the application, you can customize your components according to the color palette of your company or brand. For example, I chose to customize the library and modify the style of the components according to the Centric look and feel. This step saved me a lot of time and effort to modify each component individually and it helped me to maintain the consistency through the entire app.

Figure 5. Styling the UI Kit components

After this step you can proceed to the construction of the design. You must decide on the format of the application: whether it will be tablet or mobile. Depending on this, you will copy the mobile or tablet frame to build the design of the desired application.

In the image below you can see some screens from the application that I wanted to build. As can be seen, I kept the name of the components as it comes from UI Kit to be sure that the import is done correctly.

Figure 6. Building app screens in Figma

For other types of custom components that you want to build, you can use rectangles and other components from the library, and they will be imported as needed. This is how I proceeded with the tiles on the first screen: "Call in sick" and "Back to work".

You can use the auto-layout function in Figma and it will have no effect on the import and also .svgs for the icons because they will be imported directly as images. However, be careful if you use too many illustrations as .svg in the design, because an error may occur during import, since each path is converted into an image.

Also, even if you do the prototyping part in the design, the links between the screens will not be preserved after import. The logic behind and the interaction will be treated in the last step, in the Power Apps interface.

Step 3: Convert the design into an app

After the design has been created, you can proceed to the actual conversion of the design from Figma to Power Apps. In the figure below, you can see the mandatory fields to be filled in to create an application. You will nedd:

  • An app name;
  • A link to Figma page or frame;
  • A Figma personal access token.
Figure 7. Create app from Figma form

To copy the page link from Figma, you must right-click and copy the link that you must enter in the form. It's the same thing if you want to import just one screen.

Figure 8. Figma page link

To create a personal token in Figma, you must go to the settings and press the "Generate new token" button if you do not already have one. Then, you can copy it and insert it in the form to create a new application in Power Apps.

Figure 9. Generate Figma personal token

After filling in all the fields and choosing the application format, the import should be done, which will take very little time. Of course, the waiting time also depends on how many screens are in the Figma file and how complex they are.

Figure 10. Power Apps screens after the import

As can be seen in the image above, all the screens have been imported and look the same as in the design in Figma. A minus factor is that after import, the groupings of elements and components are not preserved. Thus, you have to go through all the screens and group the elements that belong to the same component and organize them.

Step 4: Next steps

The last step is to take care of the logic behind the application, connect components to data sources and make everything interactive and functional. Thus, after the import, the developer intervenes and takes care of all the functionality.

Figure 11. Add data source to Power Apps

Final thoughts

Even if this functionality still has certain limitations and disadvantages such as: the number of components it supports, the possibility of having a different library of icons, the Figma library that has not been updated with the latest changes in Power Apps and is not in sync with it or the fact that if the design of the application is changed, the import must be carried out again and all the logic behind must be restored. However, I think it is a functionality that also has many advantages such as: significantly reducing the time and effort to build the screens from scratch according to the design, increasing the quality of the UI and on the collaboration between the UI/UX designer and the PowerApps developers.

References

  1. *, “Create a canvass app from Figma”, 18.04.2023, [Online], Available: https://learn.microsoft.com/en-us/power-apps/maker/canvas-apps/figma/create-app-from-figma
  2. *, “Overview of creating apps from Figma”, 18.04.2023, [Online], Available: https://learn.microsoft.com/en-us/power-apps/maker/canvas-apps/figma/overview
  3. *, “Design your app using the UI kit”, 03.03.2023, [Online], Available: https://learn.microsoft.com/en-us/power-apps/maker/canvas-apps/figma/design-using-kit?source=recommendations
  4. *, “Components supported by the UI kit”, 03.03.2023, [Online], Available: https://learn.microsoft.com/en-us/power-apps/maker/canvas-apps/figma/supported-components
  5. Microsoft Power Apps – Create Apps from Figma UI kit (Preview), [Online], Available: https://www.figma.com/community/file/1110934196623232680
  6. Nielsen, J., “Low-code Platforms and User Experience”, 11.06.2021, [Online], Available: https://www.nngroup.com/videos/low-code-platforms-UX/