Working in Teams using best practices

New to Microsoft 365 or just setting up a new "Team"? Well, the first thing to consider should be how you set up a Team, what channels you should create, and how should you work with documents, tabs, etc.

So let's take a closer look at all the aspects of a "Team" on Teams.

Channel structure

For most Teams-related things we can create some sort of 'best practice', however, how you should structure your Team with channels is almost impossible to put in a best practice. Why? Well, because every Team is created for a specific purpose, with a specific set of people, all with different needs.

Should you put everything in the 'General' channel? Or should you create (lots) of different channels? In the end, there is no right or wrong here, it all depends..

If the tasks you are going to do within your team can be easily split up in different topics, then the logical step would be to create separate channels for these topics, to keep discussions focused on a (channel) topic, and not have all kinds of different discussion topics being discussed in one channel.

The size of your team also plays a big part in how you should organize things. In the case of a small team, it might be easier to just start with the general channel and go (and grow) from there.

However, in larger teams, it might be better to 'design' a good channel structure first, either alone, or with the help of one or two team members. Preferably do this before the other team members are added to the Team. This way, you can first work on creating channels and a set of ways or working.

When everything is set up, have a meeting with everybody that will be involved in the Team to make sure everybody knows how the work will be organized, what the 'rules' are, etc.

Just adding people to a Team without telling them anything beforehand is usually counter-productive.

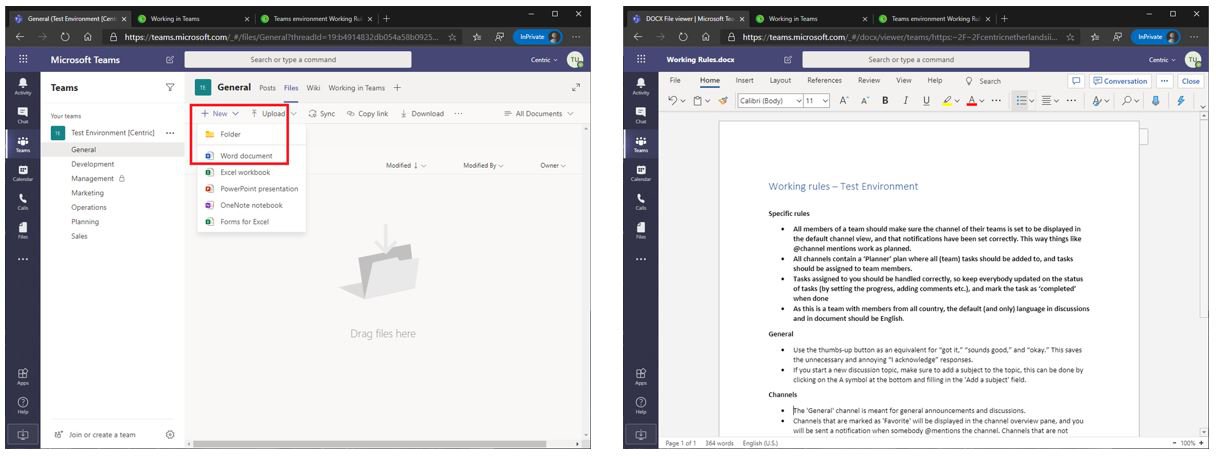
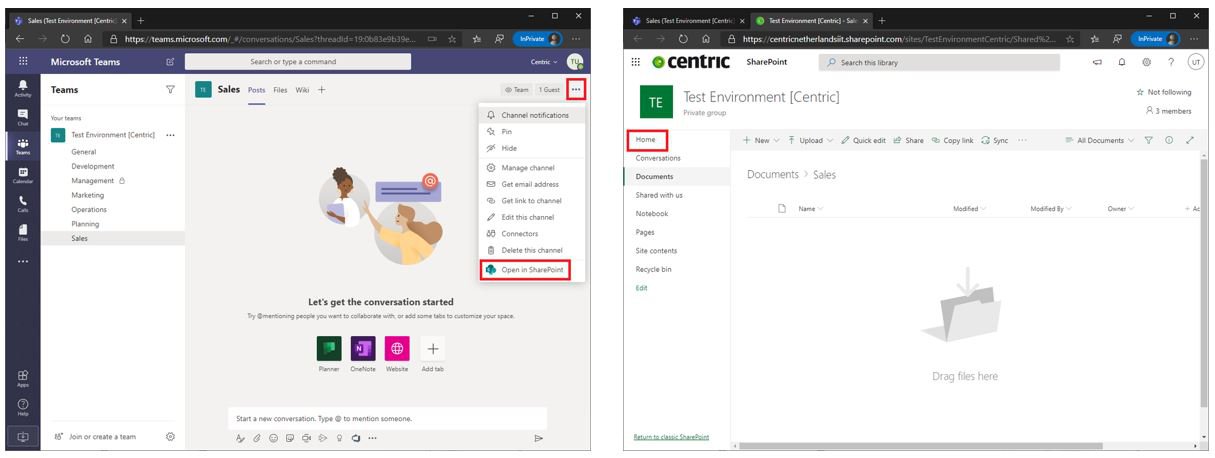
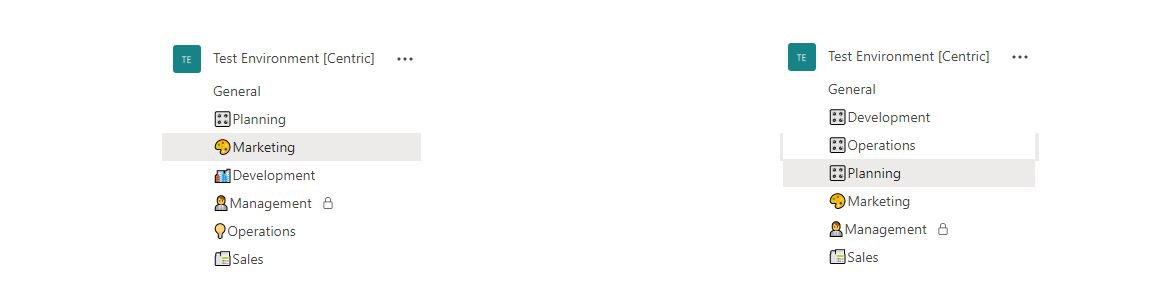
As you can see in the screenshot below, there is an example of a channel structure for a Team of a big department that has multiple teams. Each of the teams within that department will have a separate channel within that Team. By using separate channels for those teams, the information is separated between teams so a member can easily find the information they need. But as all teams are working in one Team, all the information within those teams is also available to the whole department, which improves the collaboration between those teams.

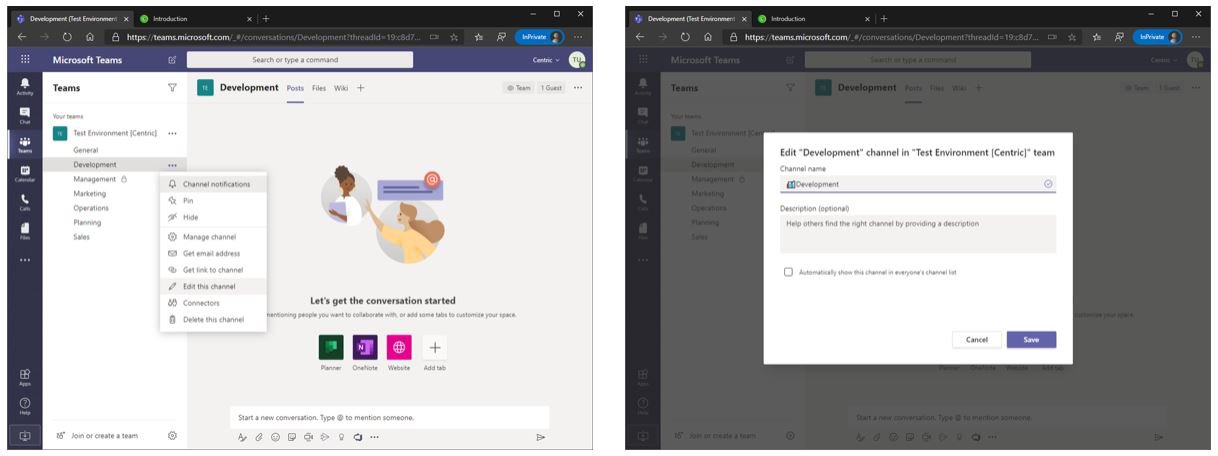
You'll notice that next to the Management channel a lock symbol is shown. This signifies that this channel is a 'private' channel, which means that unlike regular channels to which all team members have access, only a subset of users (in this case, only the managers) have access to this channel.

In the past, all channels were open to everybody, and if some discussions and documents would need to be 'shielded' from other members, then the only solution was to do these talks and file sharing through a Team Chat, or request yet another Team just for this purpose. With private channels, you can now easily create a channel that is only available to a few members within that team. Team members that are not a member of a private channel will not even see the private channel(s) in their overview.

Best practices & tips for working in a Teams Environment

If you plan on using private channels within your Teams, make sure you have thought things through. Private channels do have limitations, like, for example, you can't use any apps within a private channel, so having a planner tab in a private channel is not possible (or at least not a private planner).

Also, we don't suggest creating a lot of private channels, or having a Team with only private channels. Teams should be open working environments for everyone, so making things private should be an exception (like having a 'Management' channel in a large 'open' Team).

Ways of working

Every newly created Team should have a 'Ways of Working' tab in the 'General' channel. This tab should have some basic rules and information about working in Teams. Matt Wade has created an excellent article, 'Definitive Guide to Everyday Etiquette in Microsoft Teams', which has a lot of information that you can use for creating your own ways of working.

One of the responsibilities of a Team owner is to make sure everybody is on the same page in regards to the ways of working, so make the rules you are displayed in a place where everyone can find them, and also to 'uphold' those rules. For example, some people might need reminders about posting replies as new topics instead of as actual reply.

For larger teams, it is a good idea to create a set of ways of working specifically for that Team. As all teams are different, teams might decide on other rules than other teams, so having a document that states how everybody should be organized in this specific team can be very helpful.

These ways of working can be created in multiple ways. You can just create a Word document or OneNote or even a SharePoint page, within the Team with the information that you display in a tab in the General channel.

We like creating Word documents with our rules. It might be handy to include some (or all) of the basic rules so that your team members don't have to look in multiple pages or documents.

To create a new Word document go to the Files tab of the General channel, click on '+ New / Word document', and name your document, for example, Ways of Working.

Best practices & tips for working in a Teams Environment

After putting all of the rules for your Team into the document save/close it. This document can then be added as a tab in the General channel. This way, the information is easily available to everybody.

In the General channel, click on the '+' sign and click on 'Word', next enter a name for the tab, for example, 'Ways of Working', select the document, and click 'Save'.

Best practices & tips for working in a Teams Environment

The document is now added as a tab in the General channel, and the information is easily available to everybody.

Adding tabs to channels

Having multiple channels within a Team enables you to create a focused work environment. Instead of having to switch between different applications and documents all day to do your work, it might be more efficient to unlock these applications and/or documents directly from within Teams.

For example:

The Operations team uses the following applications and documents:

  • Monitoring website to monitor infrastructure
  • Excel document for keeping a changelog
  • Planner application to create and monitor tasks

The Marketing team uses these applications and documents:

  • Planner application to keep a team-wide 'to-do' list
  • Web browser link to the company intranet for posting news items
  • Power BI dashboard for reporting purposes

All of these applications and documents can be easily added as tabs in the Operations and Marketing channels, in the same way, we added the 'Ways of Working' document to the General channel.

For example, to create the team-wide 'to-do' list in the Marketing channel, click on the '+' sign and click on 'Planner'. Next, enter a name for the new Planner plan, and click save.

When tabs have been created for all of the applications mentioned above, a team member would only need to use the Teams application do work on all related tasks, without having to search for information, start other applications, etc.

Best practices & tips for working in a Teams Environment

Make use of OneNote in Teams

OneNote is one of those applications that can be used for just about any purpose. Do you want an easy way to centrally store meeting notes? Or do you need an application to transform handwritten notes you wrote using your tablet and pen into 'digital' notes? Then OneNote is the application to use.

OneNote can also be used by multiple people at the same time. So, for example, instead of having one person taking notes during a meeting, all attendees could add their notes simultaneously during the meeting.

Let's say the Planning department has a weekly meeting, and they would like to have all their weekly meeting notes in a central location. For this, we click on the '+' symbol in the Planning channel and click on 'OneNote, then click on '+ Create New Notebook', give the notebook a name ('Planning Meeting Notes') and press save to create the notebook.

Best practices & tips for working in a Teams Environment

In the OneNote notebook, we can then make a section for Meeting notes, and create a new page for every meeting.

OneNote is also ideal for researching or brainstorming with your team, as just about any kind of media can be added to a OneNote page; text, images, handwritten text and drawings, videos, audio files, etc.

Make use of the SharePoint site of a Team

Every Team also has its own SharePoint site. Documents that are stored in Teams are actually stored in a document library of that SharePoint site.

To work in Teams, and to work with files there is no real need to make use of the SharePoint side of things, however, there are scenarios were using SharePoint can make your Team even better.

For example, the SharePoint site can be used for creating documentation in a modern style. Using SharePoint you can create web pages with text, images, data from other sources (e.g. an excel view), which are easily editable. These pages can then be brought into Teams by adding them as tabs.

Best practices & tips for working in a Teams Environment

Here you can see a SharePoint page created with all of the information that includes tiles of the people involved, quick links to topics on that page, and the topics themselves. In these pages,there is also a view of a tab of a separate Excel document that is stored in Teams. If the excel file is modified, then these changes are directly visible on this page.

So, how do you create a SharePoint page in your Team?

Go to a channel within your Team (any will do), click the '...' item in the top right corner and click 'Open in SharePoint'. Next, click 'Home' in the left menu.

Best practices & tips for working in a Teams Environment

When you click 'Home' you will be redirected to the homepage of the SharePoint site of your Team. This homepage looks a lot look an intranet site. It has a new item block, quick links, and it displays the document library where all the Teams files are stored. Every channel you create in your Team will get a separate folder within that document library.

Best practices & tips for working in a Teams Environment

If you want, you can make this a fancy homepage, but from a Teams perspective, there is no real need to do so, as news can be easily posted in your Team and files are also available in Teams. To create a new page, click '+ New' and click 'Page'. Next, you can choose a template for the page, and your new page will open for editing.

You can now add information to the page. In this example, an introduction page for the team is being created, using the 'People' webpart to show all the team members, with some additional information. More information, like the purpose of the team, etc, could also be added.

Best practices & tips for working in a Teams Environment

When the design of the page is finished, publish it.

Next, we want to add a tab to the General channel so that all members can easily find the information. So head back to the Team, select the General channel, click on the '+' button, and select 'SharePoint' as the tab type. A list of the available pages of the SharePoint site is displayed, and you can select the created 'Introduction' page. After clicking 'Save', the SharePoint page is then shown as a tab in your Team.

Best practices & tips for working in a Teams Environment

SharePoint pages like this can be used for just about any kind of information, can be easily created and edited, offer a lot of functionality, and look a lot better than a Word document.

Best practices & tips for working in a Teams Environment

So you can use the SharePoint portion of your Team to make better information pages, or you can use it as a 'publishing' location for 'final' documents.

Keep in mind though that the SharePoint site of a Team is only accessible to the team members. If others need to access the published information, then that information should be placed on a 'regular' SharePoint site, and not on a Teams SharePoint site.

Files, Files, Files

Currently, our files live just about anywhere: in your home directory, on (multiple) file shares, on your laptop, on your OneDrive for Business, on (multiple) SharePoint sites, and in (multiple) Teams .

And these are just the 'business' file locations. Before we had OneDrive, a lot of business data was also floating around in personal storage locations, like OneDrive (personal), Google Drive and Dropbox.

So how and where should we arrange our data?

As working in the cloud enables us to do our work from any place, at any time, and on any device, it is only logical that all of our data should also be stored in the cloud. Working on your laptop works fine with data still stored on an on-premises file server, but how about when you are on the go and need to fix a document with only your smartphone? If the file is stored in a cloud location then that's no problem, but when the file is stored on an on-premises file server, you probably need to call a co-worker to fix that document as you can't access the file from your phone.

Okay, so everything should be stored in the cloud... But where?

  • Business documents should never be stored on personal cloud storage like Google Drive, DropBox or OneDrive (Personal).
  • Personal business documents (previously stored on your on-premises home directory) should be moved to your OneDrive for Business.
  • Files from your department on-premises file share should be moved to your department Team.
  • Files stored on a department on-premises SharePoint site should be moved to your department Team.

This sounds easy enough, right? Unfortunately, there are a bunch of exceptions that make things a lot more complex.

For example, if a team is creating documents for publication to a broader audience, then these documents can't/shouldn't really live in a Team , as there aren't Teams that are that broad.

In these situations, these (final version) documents should either be posted on the department's intranet site or on a separate SharePoint Online site if the information is meant for a specific target audience.

The document lifecycle

Not only will the previous location of a file dictate where the file should be stored, but the status of a document is also relevant here.

  • When working on a draft version of a document on your own, you can store the file on your OneDrive for Business (although you can of course also just start with the draft version in your Team).
  • If you want to collaborate with another person on that document, you can share it with that person from your OneDrive for Business.
  • If you want to share the document with your team, move the file to the Team of that team.
  • If the document has reached a final status and needs to be shared with people outside of your team, then move the file to either your intranet site or to a separate SharePoint Online site to which these people have access.

So in short, your Team is your 'work environment' where you work on documents. The intranet and SharePoint Online sites are 'publication platforms'.

Version history

Another aspect of working with files is versioning. A lot of people are still used to making copies of files and adding a 'V1', 'V2' or 'DRAFT' to the name, and in the end, numerous versions of the same document are floating around.

Every file that is stored in a Team (and on SharePoint and OneDrive) has automatic versioning. That means that all changes to a document are logged (including the user that made the changes), and you can easily look back into a previous version, or even revert to an older version (thus making an older version the current version).

To see previous versions of the document open that document in Teams, next, click on 'Files / Info / Version History'. On the right-hand side all the previous versions are shown, and clicking on one of them will open that particular version of the document.

Best practices & tips for working in a Teams Environment

When you have opened the document in the Word application (or any other Office application for that matter) you can click on the document name in the top bar, and select 'Version History'.

Connecting other applications to Teams

Even though all of your applications and documents can now be easily accessed directly from within Teams, you still need to go to a specific tab to see if something has changed. Wouldn't it be easier if you were to receive a notification when something happened?

As Teams is meant to function as a 'hub' for your daily work as much as possible, you can also easily 'connect' with other apps. This enables you and your team to receive notifications if anything is updated in that other application.

For example, you can connect to an (online or on-premises) Azure DevOps environment and have notifications sent about activities in your projects to your Team.

Or you can connect to Yammer to receive a notification in your Team when a new post has been created in a selected public Yammer group.

You can also connect to 3rd party apps, but keep in mind that Teams only makes the connection possible, it does not mean you are automatically licensed for these applications.

To add a connector to a channel, click on the '...' next to the channel name and click on 'Connectors. Next, select the application you want to connect, in this example, we will be connecting 'Azure DevOps'. Click on 'Add' to add the connector to the channel.

Best practices & tips for working in a Teams Environment

Next, you need to configure the connection, like choosing the project you want to receive notifications for, the team and the event type. After saving the settings, the connection is made, and whenever something is updated within the Azure DevOps environment, a notification is sent to the channel.

You can also add your Azure DevOps Kanban board or dashboard to Teams by adding this as a tab to the channel.

Certain connectors also have additional functionalities. For example, the Azure DevOps connector enables you to search for work items and use them in discussion topics.

Best practices & tips for working in a Teams Environment

By using Power Automate together with Teams you can even create more complex 'connections' between applications or services and Teams.

Use Emoji in your Team

By pressing the Windows key + '.' in any text field, a window that enables you to select an emoji opens. These emojis can also be used in Teams channel names for different purposes:

  • Adding an emoji to a channel name makes it more distinctive
  • Adding an emoji to channel names makes them look more 'fun' 😁
  • Emojis in channel names can 'group' channels together
Best practices & tips for working in a Teams Environment

If you want to add an emoji to a channel name, make sure to create the channel first using text only. This way the folder on SharePoint that gets created when creating a channel is just plain text.

Click the '...' option next to a channel name, and click on 'Edit this channel'. Edit the channel name and add an emoji before the text (by pressing WIN+ . ).

After adding an emoji to the Teams channels, you end up with something like the following. As you can see, the emojis for the 'Planning' and 'Marketing' channels have changed the order of the channels. This can be useful in larger Teams where you can use that sorting to group certain channels together.

Best practices & tips for working in a Teams Environment